
Welcome to CivilGEO Knowledge Base
Welcome to CivilGEO Knowledge Base
The Assign River Reaches command is used to manually associate, one-by-one, previously drawn polylines as river reach alignments. For example, this command can be used to assign a river reach from a stream created from the Contributing Streams command.
Refer to this article in our knowledge base to learn how to use the Contributing Streams command.
Follow the steps below to use the Assign River Reaches command:
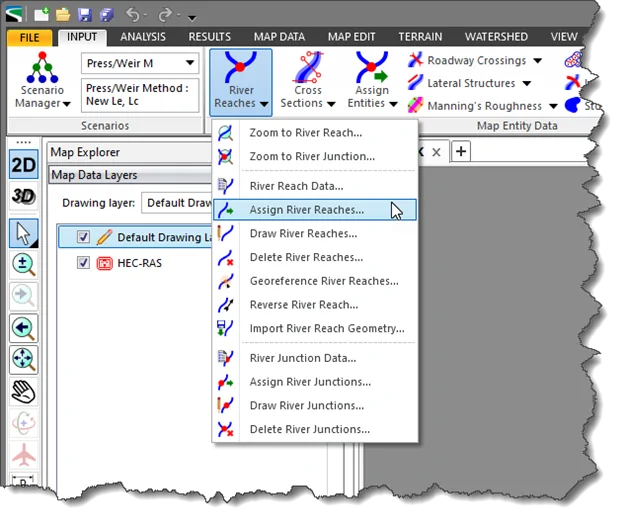
The following sections describe the Assign River Reaches command and how to interact with the above dialog box.
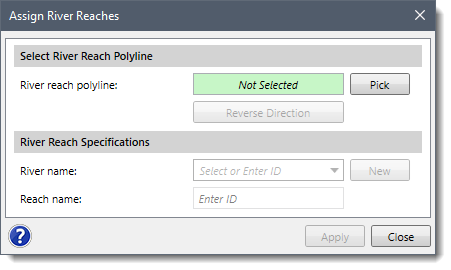
The Select River Reach Polyline section is used to interactively select a polyline from the Map View in order to assign it as a river reach. Click the [Pick] button and the dialog box will temporarily disappear. A prompt will be displayed on the status bar, informing the user what to do next. Within the Map View, click on the downstream half of the polyline to assign it as a river reach.
After selecting a polyline, the user will be returned to the dialog box, which now shows that a polyline was selected. In addition, the software will display the assumed flow direction arrow on the polyline where the user clicked. If the river reach is assigned an incorrect flow direction, click the [Reverse Direction] button.
This section is used to define the river name and reach name of the river reach polyline that was selected. Note that each river reach must have a unique ID, which is formed from the combination of the river name and reach name. This is how the HEC‑RAS software can correctly identify each river reach.
The River name dropdown combo box allows the user to select a previously defined river name. Clicking the dropdown combo box will show a listing of already existing river names in sorted ascending order.
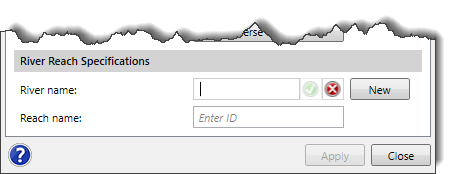
To create a new river name, either select the Add New River option from the dropdown combo box listing or click the [New] button.
![Click the [New] button](/wp-content/uploads/sites/25/2014/12/Assign-River-Reaches-Command-Img-3.png)
The dropdown combo box will change to an editable field, and the cursor will be placed into the field. The user must then enter a valid and unique river name in this field.
The Reach name entry field is used to define the reach name.
Once the river reach has been defined, click the [Apply] button to assign the selected polyline as a river reach. The river reach ID will be displayed on the Map View adjacent to the assigned river reach.


CivilGEO G2 Reviews
4.8/5.0 Rating, Over 230 Reviews

GeoHECRAS is recognized as the top Civil Engineering Design Software with an average of 4.8 out of 5.0 rating from over 230 real user reviews on G2.


We use cookies to give you the best online experience. By agreeing you accept the use of cookies in accordance with our cookie policy.
When you visit any web site, it may store or retrieve information on your browser, mostly in the form of cookies. Control your personal Cookie Services here.


