
Welcome to CivilGEO Knowledge Base
Welcome to CivilGEO Knowledge Base
A hardware problem, power failure, or software problem can cause the program to terminate unexpectedly. This article describes the options available to help you recover your project data should this happen.
Automatic saving of project files—commonly referred to as “autosave” files—are backup files created automatically by the Autosave feature. As you work in the software, the changes you make are automatically saved after an interval of time (every 5 minutes by default). Using the Save or Save As command will halt the automatic save timer until an edit is made to the project. Automatic saves are only done if the project has been modified after the last save.
If the user successfully saves the project and then closes out of the software, the autosave file is then automatically deleted.
Select File | Options to display the Options backstage page. This backstage page allows the user to modify the time interval in which the autosave operation is to run. The default interval is 5 minutes.
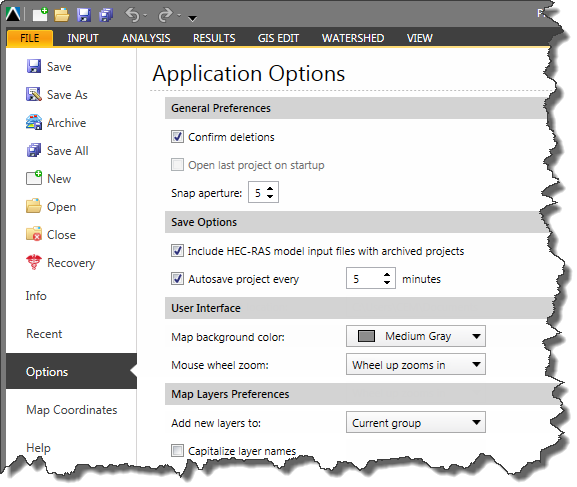
Note: Disabling the Autosave option prevents the software from creating any interim files while you work. In the event of a crash, there will be no autosave files available for data recovery.
Note: The Autosave function is not a substitute for the Save command. You should use the Save command (Ctrl+S) to save your project.
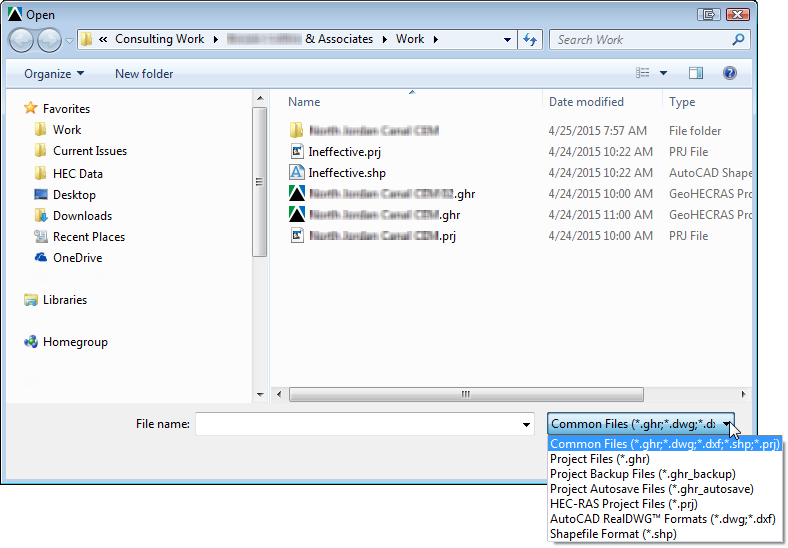
If the software crashes or an unusual termination occurs, then you may recover the project using the autosave file. The autosave file contains the project data as of when the last autosave was done. To open an autosave file, select File | Open. Then, in the Open dialog box, select the autosave file extension in the file type dropdown combo box listing. Then, select the autosave project file to open.
 Autosave File Location
If the project file has previously been saved, then the autosave file will be contained within that same folder that contains the project file. However, if the project has not yet been saved, the autosave file will be contained within the current user’s Local AppData folder. For example, if the computer user’s name is “Bob”, then the autosave file will be found in the “C:\Users\Bob\AppData\Local\CivilGeo\Autorecovery” folder.
You can find your current (updated) model at the above location, but, if you have already saved your model through the Save As option, then check the Current Project Directory location where you have saved it.
When you save your project, the software makes a backup copy of the previous version of the project (that is, the project file before the current save). This backup file will have the same name as the project, with the file extension “ghr_backup” and will be located in the same directory as the project file.
Backup files help ensure the safety of your project data. If a problem occurs, you can restore a project backup file.
Computer hardware problems, power failures or surges, user mistakes, or software problems can cause errors in a project. By saving your work frequently, you can ensure a minimum of lost data if your system fails for any reason. If a problem occurs, you can restore a project backup file.
In order to open a backup file, either rename the file extension to “ghr” or from the File | Open dialog box, select the project backup files in the file type dropdown combo box listing. If you are renaming the file extension, you may want to also rename the file to avoid overwriting the original project file.
The Project Recovery Manager helps with the task of locating and opening projects that were last open when the software crashed, as well as any backup and autosave files associated with those projects.
When you launch the software after a crash, the Project Recovery Manager dialog box will automatically be displayed. (You can also display this dialog box by selecting File | Recovery.) This dialog box determines what projects were active when the crash occurred and displays those projects and the associated backup and autosave files in a single, easy-to-use interface.
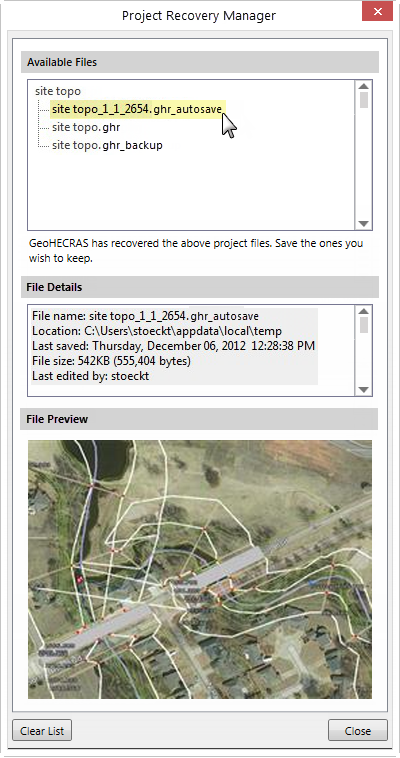
Using the Project Recovery Manager, you can open backup and autosave files directly without having to manually locate and rename the files. The first time you attempt to save a backup or autosave file, you will be prompted to rename the file.
To open a file from the listing, either double click on the file or right click and choose Open from the displayed context menu. To remove a file from the listing, right click and choose Remove from the displayed context menu.
Note: The project, backup, and autosave files are listed in the order that they were last saved.
Note: The Project Recovery Manager is only useful after a crash has occurred and will only display information about project files that were active during a session that crashed. You cannot launch the Project Recovery Manager during a normal working session and have it show you the backup and autosave files for the current project.
If the program encounters a problem and closes unexpectedly, the software will display an error report dialog box. You can choose to send the error report to CivilGEO in order help our software developers diagnose problems with the software. The error report includes information about the state of your system at the time the error occurred. You can also add other information, such as what you were doing at the time of the error.


CivilGEO G2 Reviews
4.8/5.0 Rating, Over 230 Reviews

GeoHECRAS is recognized as the top Civil Engineering Design Software with an average of 4.8 out of 5.0 rating from over 230 real user reviews on G2.


We use cookies to give you the best online experience. By agreeing you accept the use of cookies in accordance with our cookie policy.
When you visit any web site, it may store or retrieve information on your browser, mostly in the form of cookies. Control your personal Cookie Services here.


