
Welcome to CivilGEO Knowledge Base
Welcome to CivilGEO Knowledge Base
With so many civil engineering software applications available, each with their own proprietary database structures, data interoperability has become a major problem. Over time, engineering consultants and review agencies called upon the industry to develop a standard design data format that would allow quick and easy data exchange capability from one software application to another. In 2000, LandXML.org, led by an industry-driven consortium of partners, came forward to provide a non-proprietary data exchange standard called LandXML.
CivilGEO’s software utilizes LandXML to share data with many other civil engineering software programs, such as:
LandXML is a file format that has been developed as an industry standard for civil engineering, land planning, and surveying software. This open data file format is readable by various applications. Because of its non-proprietary nature, LandXML files can be easily imported and exported from one application to another, without relying on any specific vendor and their programs.
Using LandXML, you can transfer data from one application to another, archive the project data in a non-proprietary format, view, edit, and report data using web-based tools, as well as adjust the elevation of the data globally.
However, when you are exporting or importing data in the LandXML format, keep in mind that you won’t get data in a “ready to go” condition; you have to carefully incorporate drawing information and other features by taking reference from the original drawing. You must also make sure that the software version of LandXML is compatible while importing and exporting.
When you are working on MicroStation, specifically OpenRoads, MX Roads, InRoads, and GEOPAK, you can import its surfaces into CivilGEO’s software using the LandXML format. Our software fully supports LandXML files and importing this format into the software is a quick and easy process. Importing MicroStation surface into the software is a two-step process: first exporting the surface into LandXML file format, and then importing it into the software.
Below are the steps described for importing various MicroStation Surfaces into the software.
To import terrain surfaces from Bentley MX Roads, you must first export the surface to LandXML format. To export the data to a LandXML file, follow these steps:
After exporting the terrain surface as a LandXML file, you can import it into CivilGEO’s software. Refer to this knowledge base article on how to import a LandXML terrain surface file into CivilGEO’s software.
To import terrain surfaces from Bentley InRoads, you must first export the surface to LandXML format. Make sure to model your road before exporting. Further, there are two types of design data that you can export from InRoads: Terrain Surface Data and Geometry Data. Also, there is no default setting for exporting surfaces to LandXML. You have to turn on the feature by following these steps:
Then you can proceed to export design data according to your requirement.
Follow these steps to export the terrain surface as a LandXML:

After exporting the terrain surface as a LandXML file, you can import it into CivilGEO’s software. Refer to this knowledge base article on how to import a LandXML terrain surface file into CivilGEO’s software.
Follow these steps to export the geometry or alignment data as a LandXML file:


After exporting the data as a LandXML file, you can import it into CivilGEO’s software. Refer to this knowledge base article on how to import a LandXML terrain surface file into CivilGEO’s software.
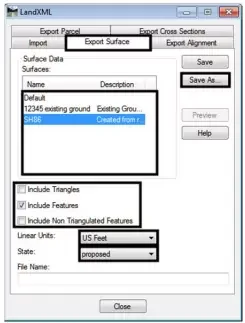
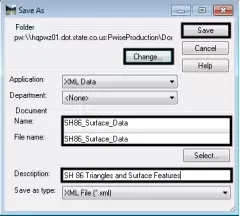
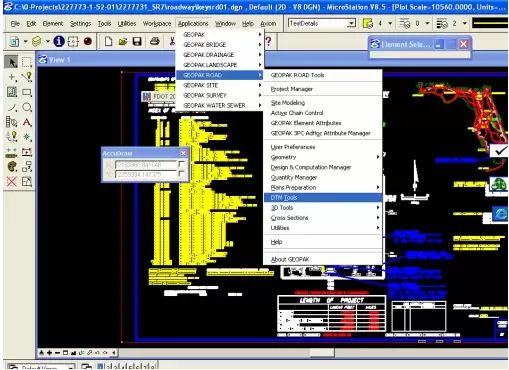
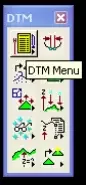
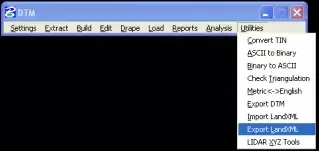
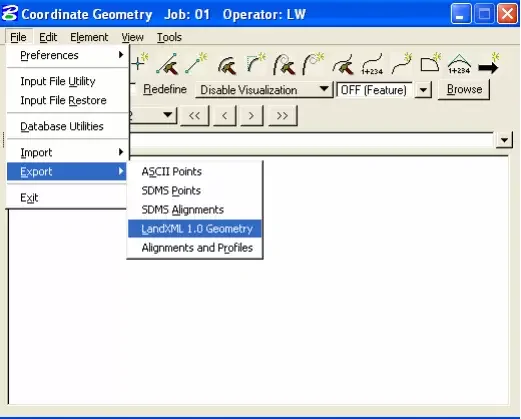
To import terrain surfaces from Bentley GEOPAK, you must first export the surface to LandXML format. You have the option to export design data of two types: DTM (terrain surface) and Geometry Data.
If your DTM is in a TIN format, you can directly export the DTM to a LandXML file. Otherwise, you will need to create a TIN before exporting.
Follow these steps:
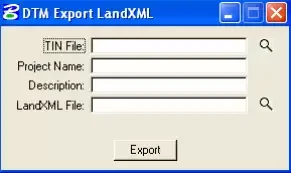
After exporting the terrain surface as a LandXML file, you can import it into CivilGEO’s software. Refer to this knowledge base article on how to import a LandXML terrain surface file into CivilGEO’s software.
Follow these steps to export the geometry data as a LandXML file:
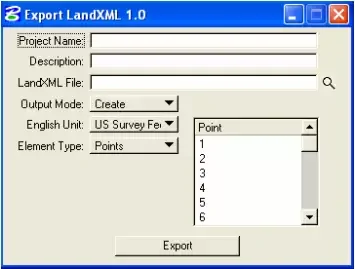
After exporting the data as a LandXML file, you can import it into CivilGEO’s software. Refer to this knowledge base article on how to import a LandXML terrain surface file into CivilGEO’s software.
If you need any assistance on importing MicroStation Surfaces into our engineering software, feel free to contact our technical support team. They will be glad to assist you.


CivilGEO G2 Reviews
4.8/5.0 Rating, Over 230 Reviews

GeoHECRAS is recognized as the top Civil Engineering Design Software with an average of 4.8 out of 5.0 rating from over 230 real user reviews on G2.


We use cookies to give you the best online experience. By agreeing you accept the use of cookies in accordance with our cookie policy.
When you visit any web site, it may store or retrieve information on your browser, mostly in the form of cookies. Control your personal Cookie Services here.


