
Welcome to CivilGEO Knowledge Base
Welcome to CivilGEO Knowledge Base
Downloading DEM (Digital Elevation Model) data is a fundamental step in acquiring detailed information about the Earth’s topography. DEM data provide elevation values for various geographic locations, allowing for the creation of 3D terrain models. These models find applications in fields such as environmental analysis, urban planning, hydrological modeling, and more.
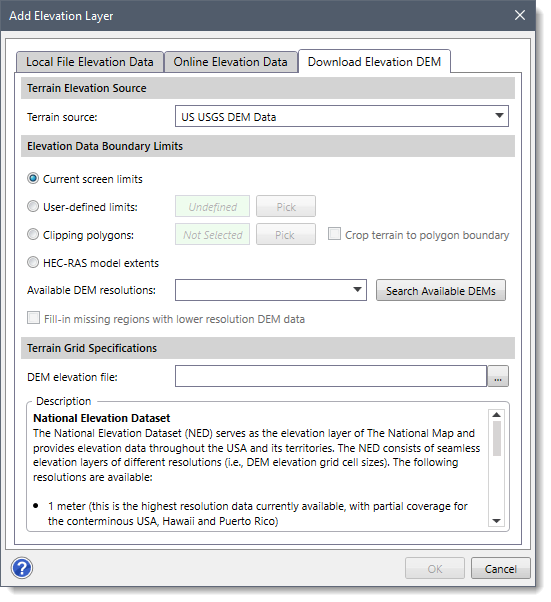
In CivilGEO software, the Download DEM Data command allows the user to download elevation data for the project area. If a coordinate reference system (CRS) is defined and the user is zoomed into an area that is no more than 100 square miles (260 square kilometers) in size, this command can be used to download high-resolution DEM data for various countries around the world, including:
Note: The horizontal spatial resolution of DEM data varies, depending upon the region being modeled, but typically varies from 0.5 to 9 meters. For example, most of Canada and about one-half of the USA are available in 1-meter resolution. Another quarter of the USA is available in 3-meter resolution and the entire USA is available in 9-meter resolution.
Follow the steps below to use the Download DEM Data command:

Refer to this article in our knowledge base to learn more about this command.


CivilGEO G2 Reviews
4.8/5.0 Rating, Over 230 Reviews

GeoHECRAS is recognized as the top Civil Engineering Design Software with an average of 4.8 out of 5.0 rating from over 230 real user reviews on G2.


We use cookies to give you the best online experience. By agreeing you accept the use of cookies in accordance with our cookie policy.
When you visit any web site, it may store or retrieve information on your browser, mostly in the form of cookies. Control your personal Cookie Services here.


