The Floodway Map Settings command allows the user to control how the software will plot the computed floodplain and floodway on the Map View after computing the floodplain encroachment data. To learn more about computing floodplain encroachment data, refer to this article in our knowledge base.
Follow the steps below to use the Floodway Map Settings command:
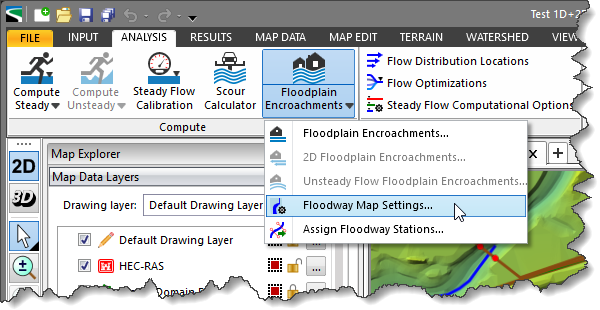
- From the Analysis ribbon menu, click the Floodplain Encroachments dropdown menu and select the Floodway Map Settings command.
- The Floodway Map Settings dialog box will be displayed.
The following sections describe how to use the Floodway Map Settings command and interact with the above dialog box.
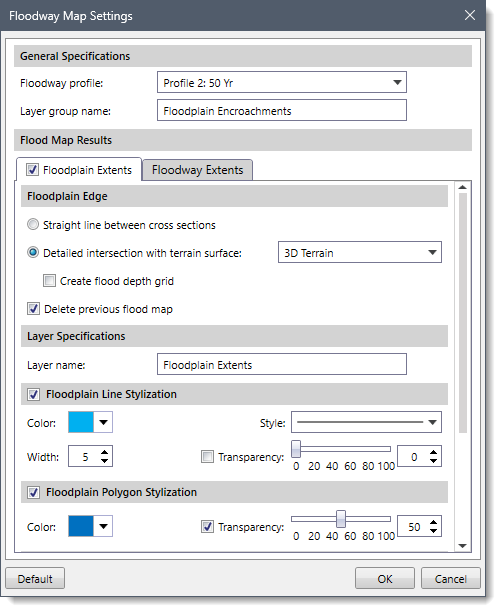
General Specifications
The General Specifications section allows the user to define the specifications for the floodway maps.
The following options are available in this section:
- Floodway profile
This dropdown combo box lists all profiles defined in the current scenario of the project, excluding the first profile. By default, profile number 2 is selected. This dropdown combo box option is only available for steady flow data.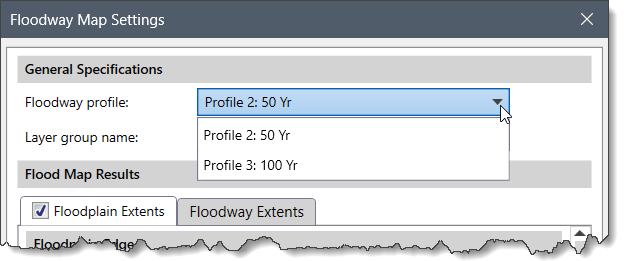
Note that the user can view all profiles available in the project by clicking the [Profiles] button in the Profile Plot command. Refer to this article in our knowledge base to learn more about the Profile Plot command.![Profile Plot command - [Profiles] button](https://knowledge.civilgeo.com/wp-content/uploads/2025/11/Floodway-Map-Settings-Command-Img-5.png)
- Layer group name
This entry field defines the name of the layer group that will be created in the Map Data Layers panel, which will contain the floodplain extent, flood contour, and floodway extent layers. Note that this layer group is created only after the floodplain encroachment data have been successfully computed.
Flood Map Results
This section allows the user to choose which flood map results to generate. This section contains two panels:
- Floodplain Extents
- Floodway Extents
Floodplain Extents
This panel allows the user to define the boundary of the floodplain extents based on the floodway profile. Note that the contents of the Floodplain Extents panel will only be enabled if the checkbox at this panel is checked.
The following sections are available in the Floodplain Extents panel:
Floodplain Edge
This section allows the user to specify how the floodplain edge is computed between cross sections.
The following options are available in this section:
- Straight line between cross sections
This radio button option allows the software to connect floodplain edges at cross sections using straight lines to generate the flood map polygon.
- Detailed intersection with terrain surface
This radio button option allows the software to compute the floodplain edge by intersecting the floodway profile with the selected terrain surface. This option is typically used when higher precision is required for flood map areas, especially when working with high-resolution terrain data such as LiDAR-based surfaces. The user can select from the terrain surfaces available in the project using the adjacent dropdown combo box.
- Create flood depth grid
This checkbox option causes the software to create a flood depth raster grid. By default, this checkbox is unchecked. Note that this checkbox is only enabled when the Detailed intersection with terrain surface option is selected.
- Create flood depth grid
- Delete previous flood map
This checkbox option allows the user to delete any previously generated flood map.
Layer Specifications
This section allows the user to define the name of the layer in the Layer name entry field that will be created in the Map Data Layers panel to store floodplain extents. The default layer name is Floodplain Extents, which is editable.
Floodplain Line Stylization
This section allows the user to define the color, width, and transparency of the polylines that will depict the boundary of the floodplain. By default, the checkbox at the Floodplain Line Stylization section header is checked.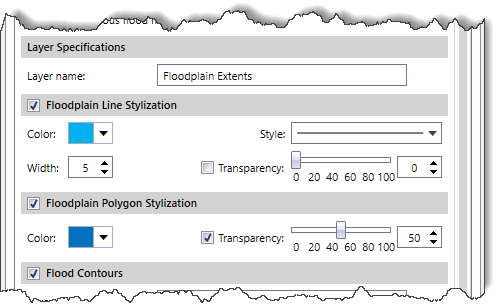
Floodplain Polygon Stylization
This section allows the user to define the fill color and transparency of the polygon that will depict the floodplain area. By default, the checkbox at the Floodplain Polygon Stylization section header is checked.
Flood Contours
This section allows the user to generate contour lines for the floodplain extents. By default, the checkbox at the Flood Contours section header is unchecked.
The following options are available in this section:
- Layer name
This entry field defines the name of the layer that will be created in the Map Data Layers panel to store the flood contours. The default layer name is BFE Contours, which may be edited.
- Contour interval
This entry field defines the interval between the flood contour lines. By default, the software uses a value of 1 ft for the interval.
- Contour treatment
This dropdown combo box allows the user to select the type of contour lines to be generated for the flood contours. The available entries are Original Line, Smoothed Line, and Straight Line.
- Color
This color palette allows the user to select the color of the flood contour lines.
- Width
This spin control entry field allows the user to select the width of the flood contour lines. By default, the software uses a value of 5. The user can enter a different value ranging from 1 to 100.
- Style
This dropdown combo box allows the user to select the style of the flood contour lines.
- Contour labels
This checkbox option allows the user to display labels on the flood contour lines.
- Height
This spin control entry field allows the user to select the height of the labels on the flood contours. By default, the software uses a value of 10. The user can enter a different value ranging from 1 to 100.
- Align
This dropdown combo box allows the user to select the alignment of the label with respect to the flood contour lines. The available alignment options are Horizontal and With Contours.
Floodway Extents
This panel allows the user to define the boundary of the floodway extents based on the floodway profile.
The following sections are available in the Floodway Extents panel:
Floodway Edge
This section connects floodway edges between cross sections with straight lines to create the flood map polygon. The Delete previous flood map checkbox option allows the user to delete any previously generated flood map.
Layer Specifications
This section allows the user to define the name of the layer in the Layer name entry field that will be created in the Map Data Layers panel to store the floodway extents. The default layer name is Floodway, which is editable. The Prefix profile number checkbox option allows the software to automatically add the selected profile number to the beginning of the layer name. By default, the Prefix profile number checkbox is checked.
Floodway Line Stylization
This section allows the user to define the color, width, style, and transparency of the polylines that will depict the boundary of the floodway. By default, the checkbox at the Floodway Line Stylization section header is checked.
Floodway Polygon Stylization
This section allows the user to define the fill color and transparency of the polygon that will depict the floodway area. By default, the checkbox at the Floodway Polygon Stylization section header is checked.
Note: The user can click the [Default] button to restore floodway map settings to their original default values.
Once all the options have been defined, click the [OK] button to save the floodway map settings.