
Welcome to CivilGEO Knowledge Base
Welcome to CivilGEO Knowledge Base
While working on an engineering project, you frequently zoom, pan, and rotate the Map View. Therefore, it is important to be as efficient as possible. This article describes the various ways to zoom, pan, and rotate the Map View quickly and efficiently.
Use the Dynamic Zoom tool to zoom in or out of the Map View while viewing or working on a specific area. Zooming in or out enables a user to manually set the desired Map View magnification level.
Click on the Dynamic Zoom tool from the Map View toolbar to select it, then use this tool in the following ways:
To zoom in or out while the Dynamic Zoom tool is not selected, roll the mouse wheel up or down.
This is helpful when another tool or command is selected and you do not want to switch tools or stop the current command.
You can also change the rate at which to zoom in or out of an area using the mouse wheel:
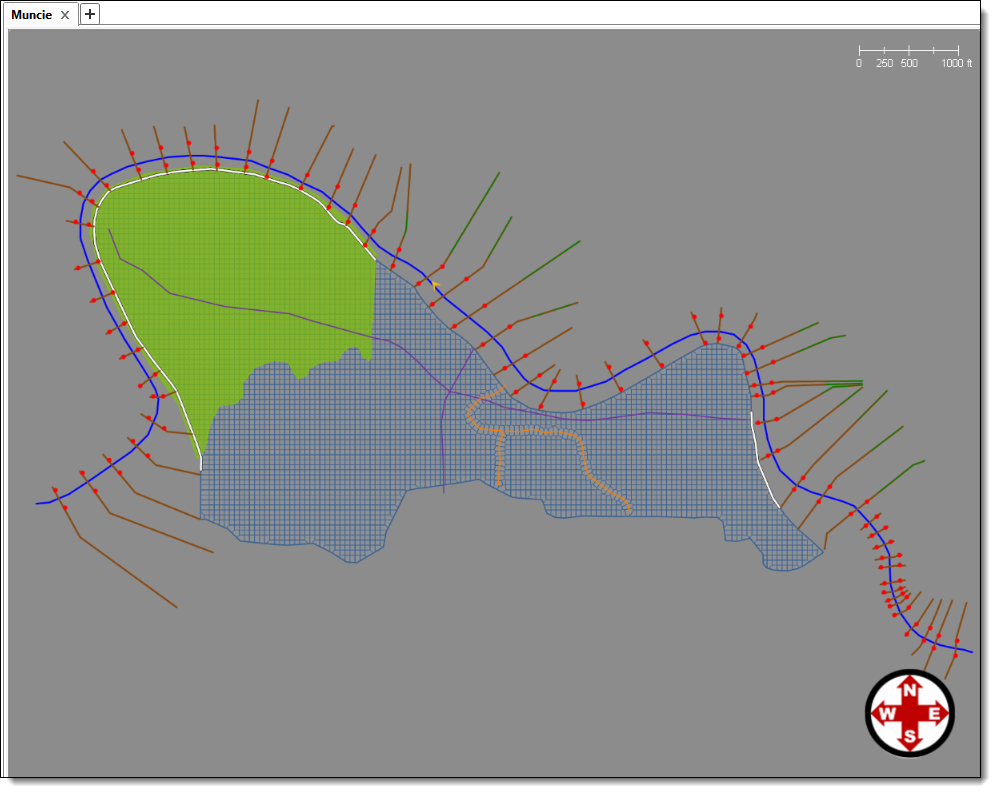
When the user zooms into the Map View, the visual information of the corresponding element(s) (for example, cross-section IDs, overbank roughness, reach IDs, etc) will be displayed in detail.
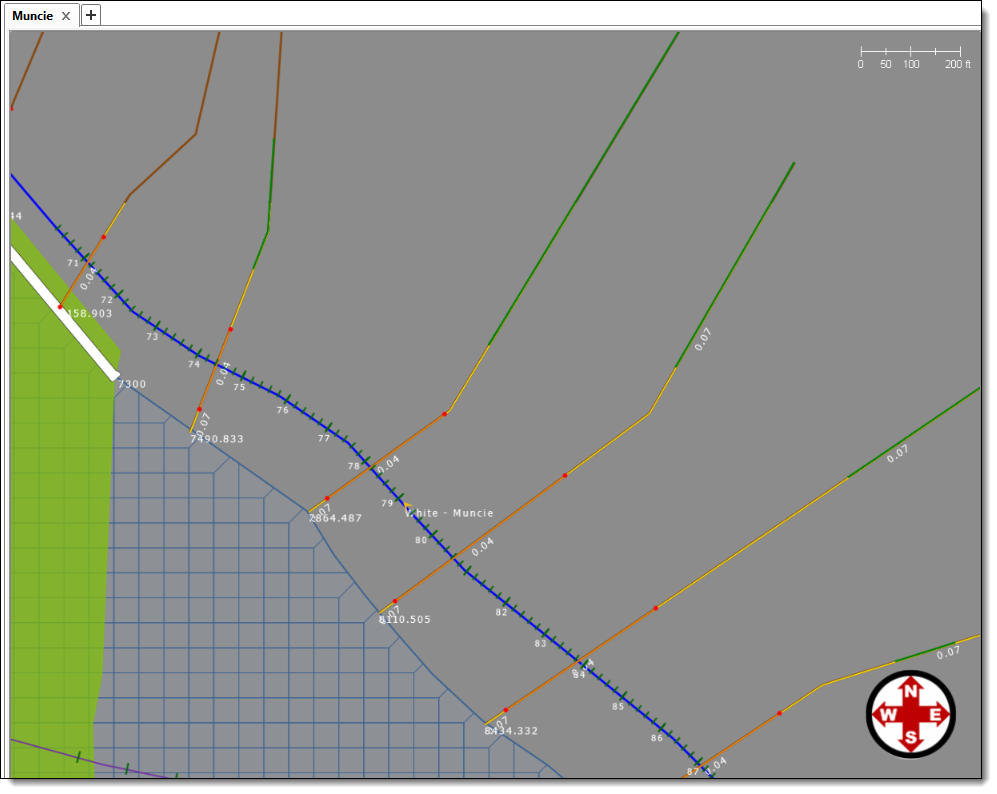
In contrast, when the user zooms out on the Map View, only limited/less information such as a schematic diagram of the element(s) will be displayed.
Use the Navigate Backward command to go back through previous views of the Map View. Clicking this button steps back the current view to a previous view.
After backing up through previous views using the Navigate Backward command, the Navigate Forward command can be used to move forward through successive views of the Map View. Clicking this button advances the view to the next view.
Note: The Navigate Backward and Navigate Forward commands allow you to quickly switch between recent views.
Use the Bookmarked Views panel to view, add, save, and remove bookmarked views, as well as create and view Video Tours.
This panel enables you to save views as bookmarks—allowing you to quickly switch between different views. Clicking a bookmarked view changes the location, zoom level, and 2-D/3-D orientation of the Map View to that of the previously saved bookmarked view.
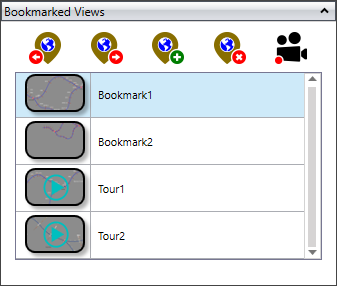
The panel offers the following commands:
Use the Zoom Extents command to zoom the Map View to the extents of the project data.
Note: If no model elements are defined, then this command causes the Map View to zoom out to the extent of the current map layer.
Use the Pan tool to pan the Map View. Click on the Pan tool from the Map View toolbar to select it, and then click and hold down the left mouse button. Then, drag the mouse pointer to pan about.
If the computer mouse has a clickable scroll wheel (or a middle button), click and hold it down. Then, drag the mouse pointer to pan about on the Map View. This is helpful when another tool or command is active, and you do not want to switch tools or stop the current command.
You can use the Rotate View tool to rotate the Map View. Click on the Rotate View tool from the Map View toolbar to select it, and then click and hold down the left mouse button. Then, drag the mouse pointer to rotate the view.
Note: This tool only works while in the 3D view mode.
You can use the Free Look tool to view the Map View at different angles from the current viewpoint. Click on the Free Look tool from the Map View toolbar to select it, and then click and hold down the left mouse button. Then, drag the mouse pointer to change the viewpoint viewing angle.
To change the location of the viewpoint, use the Pan, Dynamic Zoom, and Rotate View tools as previously described.
Note: This tool only works while in the 3D view mode.


CivilGEO G2 Reviews
4.8/5.0 Rating, Over 230 Reviews

GeoHECRAS is recognized as the top Civil Engineering Design Software with an average of 4.8 out of 5.0 rating from over 230 real user reviews on G2.


We use cookies to give you the best online experience. By agreeing you accept the use of cookies in accordance with our cookie policy.
When you visit any web site, it may store or retrieve information on your browser, mostly in the form of cookies. Control your personal Cookie Services here.


