
Welcome to CivilGEO Knowledge Base
Welcome to CivilGEO Knowledge Base
GeoHECRAS is a data wrapper to the HEC‑RAS software. By using the Import HEC-RAS Project command of GeoHECRAS, it is quite easy to import any existing HEC‑RAS model. This command allows the user to import a preexisting HEC-RAS river model and then display it on the Map View.
Follow the steps below to import a HEC‑RAS model:
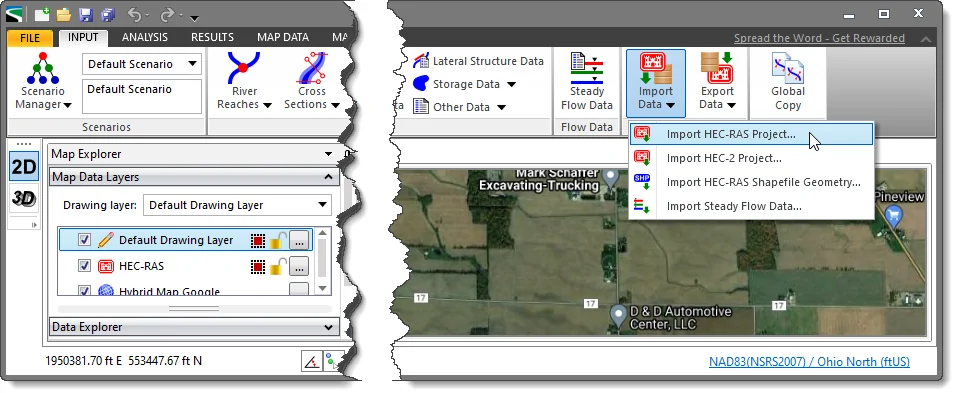
The following sections describe how to use the Import HEC-RAS Project command and interact with the above dialog box.
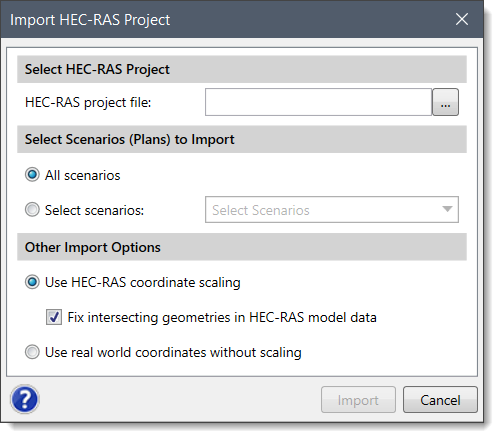
The Select HEC-RAS Project section allows the user to select the HEC‑RAS project file. Click the […] browse button to select the HEC‑RAS project file. The software will display the Import HEC‑RAS Project File dialog box. From the displayed dialog box, select the HEC-RAS project file. After selecting the HEC‑RAS project file, the user will be returned to the Import HEC‑RAS Project dialog box, and the complete directory path and the file name will be shown in the HEC-RAS project file entry.
The Select Scenarios (Plans) to Import section contains radio button options that control what plan data from the selected HEC‑RAS project file are to be imported. The following options are provided:
The All scenarios radio button option provides the ability to import all scenarios (or plans) contained within the selected HEC‑RAS project. By default, this option is selected, and all scenarios will be imported.
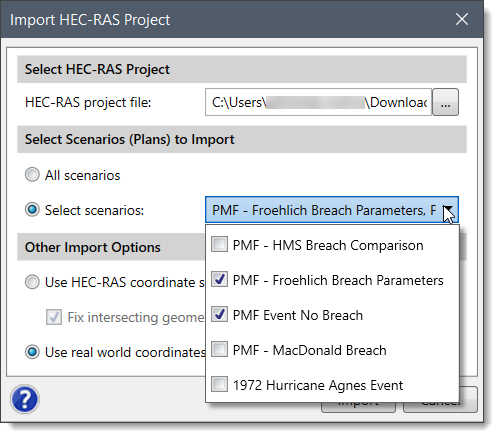
The Select scenarios radio button option provides the ability to import a specific scenario (or plan) from the HEC‑RAS model. This is helpful in the case of extremely large HEC‑RAS models where only one scenario needs to be considered. The Select Scenario dropdown combo box lists all the scenarios contained within the model. The user can select the checkboxes for the corresponding scenarios that are to be imported.
This section is used to determine if the imported HEC-RAS model is georeferenced to real world coordinates or simply a schematic representation of the HEC-RAS model. The following options are provided:
The Use HEC-RAS coordinate scaling radio button option is automatically selected when the software has determined that the HEC-RAS model being imported is not georeferenced. The software will then scale the model up based upon the lengths defined for each reach so that the model is at the correct coordinate extents.
The Fix intersecting geometries in HEC‑RAS model data checkbox option is used to automatically align cross sections that overlap each other. The software will auto-detect when to apply this option and the user does not need to override this option. By default, this checkbox option is checked. However, any changes to this checkbox are remembered for the application session.
The Use real world coordinates without scaling radio button is automatically selected when the software has determined that the HEC-RAS model being imported is georeferenced.
When all the options have been properly defined, click the [Import] button to import the HEC‑RAS project. After the HEC‑RAS project is imported, the extent of the model will be displayed in the Map View.


CivilGEO G2 Reviews
4.8/5.0 Rating, Over 230 Reviews

GeoHECRAS is recognized as the top Civil Engineering Design Software with an average of 4.8 out of 5.0 rating from over 230 real user reviews on G2.


We use cookies to give you the best online experience. By agreeing you accept the use of cookies in accordance with our cookie policy.
When you visit any web site, it may store or retrieve information on your browser, mostly in the form of cookies. Control your personal Cookie Services here.


