Storage Areas are lake-like regions where water can be channeled in or out. In CivilGEO’s software, the user can use the Automated Draw Storage Areas command to define the boundary of a storage area. The software defines the storage area boundary by creating a planar surface at the defined water surface elevation and then intersects it with the defined terrain surface. The resultant clipped polygon represents the storage area (or reservoir).
Follow the steps below to use the Automated Draw Storage Areas command.
- From the Input ribbon menu, select the Storage Areas dropdown menu and then choose the Automated Draw Storage Areas command.
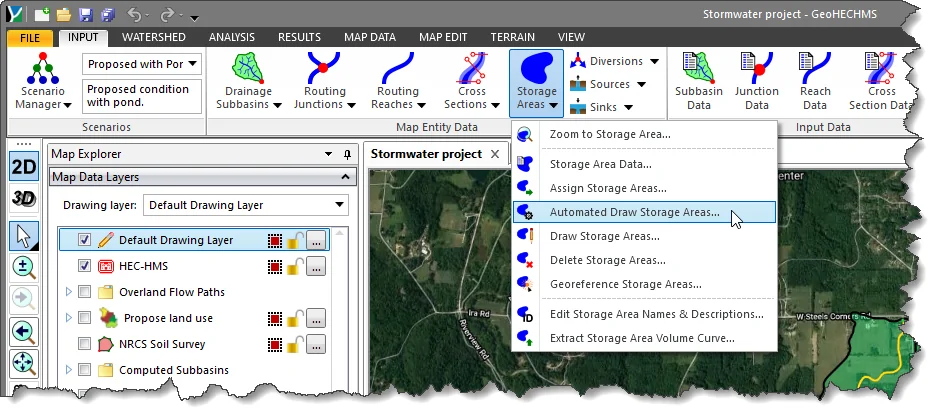
- The Automated Draw Storage Areas dialog box will be displayed.
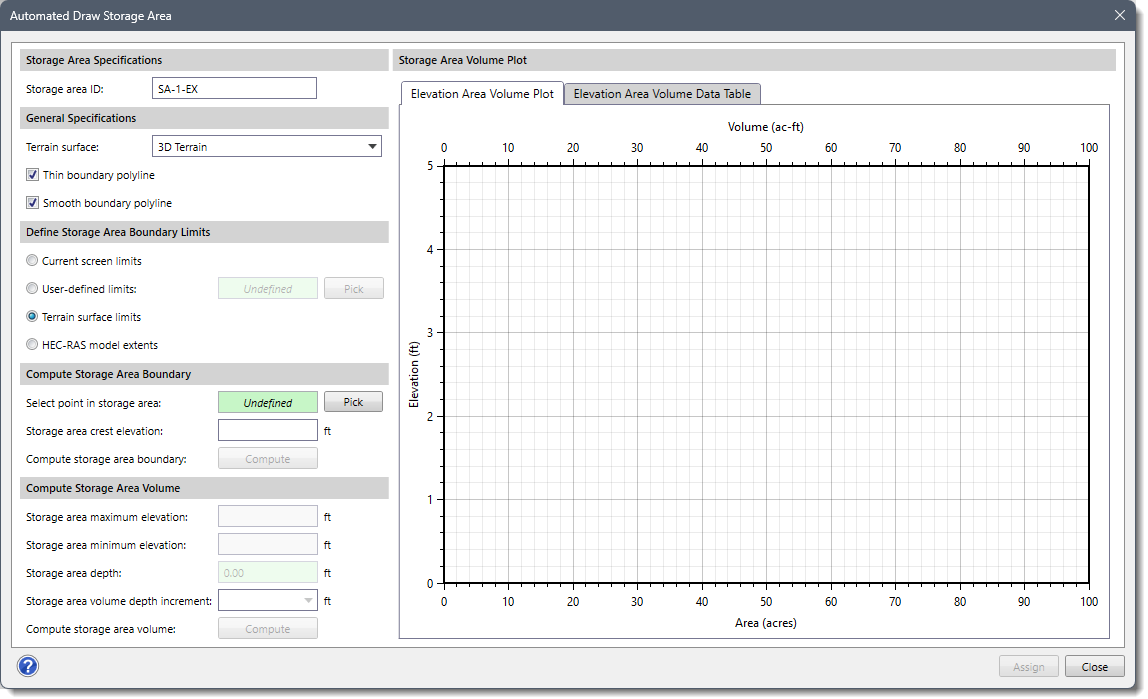
The following sections describe the Automated Draw Storage Areas command and how to interact with the above dialog box.
Storage Area Specifications
This section is used to define the storage area ID. By default, the storage area ID is automatically suggested in the Storage area ID entry using a predefined format. However, the user can enter a different ID if needed.
General Specifications
This section is used to define the general specifications for drawing the storage area.
Define Storage Area Boundary Limits
This section is used to define the maximum limits for generating the storage area boundary. The following options are available to define the maximum limits for generating the storage area boundary:
- Current screen limits
The software will use the Map View screen display as the boundary limit for generating the storage area boundary.
- User-defined limits
The user can draw a rectangle to define the storage area boundary limits. Click the [Pick] button to define the storage area boundary limits. The dialog box will temporarily disappear, and an information message will be displayed on the status bar. Click and drag a rectangular region to define the limits. After releasing the mouse, the user will be returned to the dialog box. A layer will be created with a rectangular box that represents the user-defined selected region.
- Terrain surface limits
The terrain surface area used to generate the storage areas boundary will have the same extent as the elevation grid.
- Model extents
If a project model has been defined, this option will create a bounding rectangular region to correspond to the extent of the defined model, plus an additional buffer boundary.
Compute Storage Area Boundary
This section is used to define where the software should create a storage area boundary. The software requires the user to select a point within or on the boundary of the storage area to define the parameters for computing the storage area boundary. Note that if there is no terrain surface defined for the selected scenario, then this section is disabled (i.e., grayed out).
- Select point in storage area
This entry allows the user to select a point within the storage area or on its boundary. Clicking the [Pick] button will cause the Automated Draw Storage Areas dialog box to temporarily disappear. A prompt will be displayed on the status bar instructing the user to select a point on the Map View. After selecting a point, the user is immediately returned to the dialog box and the entry will be changed from Undefined to Defined.
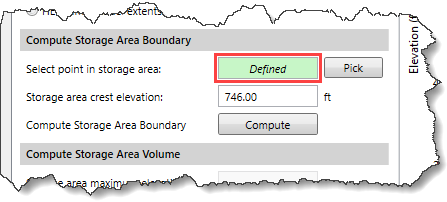
- Storage area crest elevation
This entry field allows the user to define an elevation at which the software will determine the storage area boundary. Note that the software automatically computes this entry once the user selects a point within the storage area or on its boundary. However, the user can enter a different value if needed.
- Compute storage area boundary
Clicking the [Compute] button causes the software to compute the storage area boundary. Note that this button is disabled until the user has defined the previous entries.
Compute Storage Area Volume
This section is used to define how the software should compute the storage area volume curve. Note that this section is disabled until the user has computed a storage area boundary.

The following entries are provided:
- Storage area maximum elevation
This entry allows the user to define the maximum elevation to be used in computing the storage area volume curve for the selected storage area. Note that the software automatically computes this entry once the storage area boundary has been computed. However, the user can enter a different value if needed.
- Storage area minimum elevation
This entry allows the user to define the minimum elevation to be used in computing the storage area volume curve for the selected storage area. Note that the software automatically computes this entry once the storage area boundary has been computed. However, the user can enter a different value if needed.
- Storage area depth
This read-only field represents the difference between the Storage area maximum elevation entry and the Storage area minimum elevation entry.
- Storage area volume depth increment
This dropdown combo box entry allows the user to select the storage area volume depth increments. The dropdown combo box lists the following storage area volume depth increments:
- 0.1
- 0.25
- 0.50
- 1 (default)
- 2
- 2.5
- 5
- 10
- 20
- Compute storage area volume
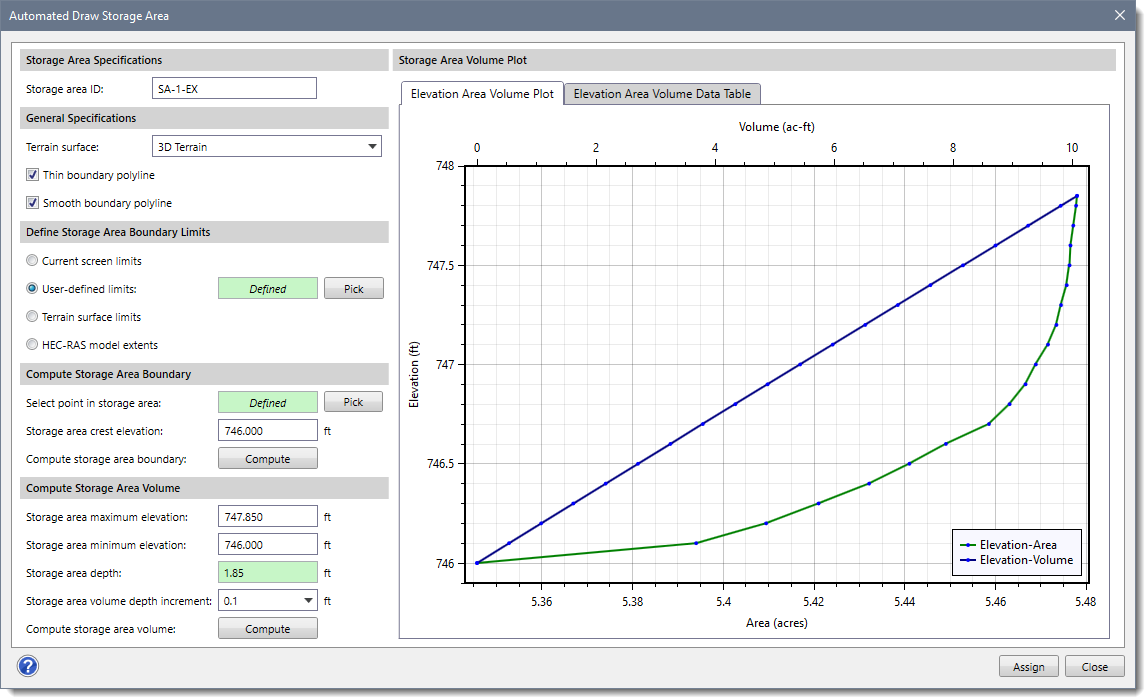
Clicking the [Compute] button causes the software to compute the storage area volume. The software will then update the Elevation Area Volume Plot with the extracted storage area volume curve data from the selected terrain surface, as shown below.
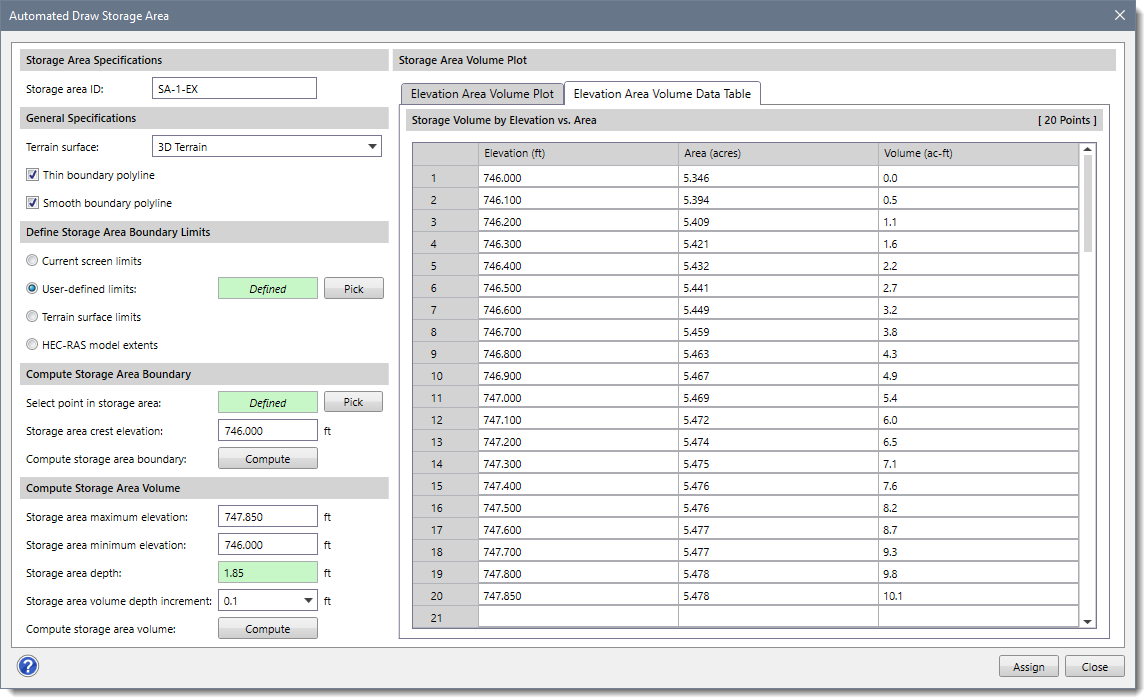
 The software will also update the corresponding Elevation Area Volume Data Table with the extracted storage area volume curve data from the selected terrain surface, as shown below.
Assigning Storage Area
When all the options have been defined in the Automated Draw Storage Areas dialog box, click the [Assign] button. The software will then define the storage area on the Map View.
Note that the [Assign] button will be disabled (i.e., grayed out) until the user has defined the data for Storage area Specifications and Compute Storage Area Boundary sections.


